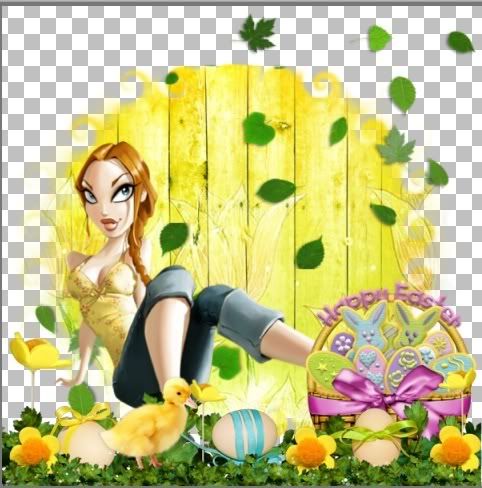
TUTORIAL "SWEET EASTER"

This tutoria was made by me: Dilcia aka Disyas Digitals Designs on April 10th 2011. Was made from my own ideas, any resemblance with other tutorials is purely coincidental.
This tutorial was made in PSPXI, but you can make it in other version.
NOTES
To make this tutorial you will need some knowledge of
PSP. Was made in PSPXI, but you can make it in other version.
NEEDED SUPPLIES:
PTU KIT "SWEET EASTER" by Disyas Digitals Designs, you can buy it here.
Mask Disyas_Mask3.JPG, included in the zip.
PTU PINUPTOONS SOPHIE GRASS TUBE, this tube was an special edition
but you can buy the pinup toon that you prefer in: http://www.cdoestore.com
FONT TANGERINE, you can find this font at: http://www.fontsquirrel.com/
PREPARATION:
Unzip the font and copy the file in your folder: Windows/Fonts or Windows/Fuentes
Okey, lets go to start.
STEP 1
Open your PSP.
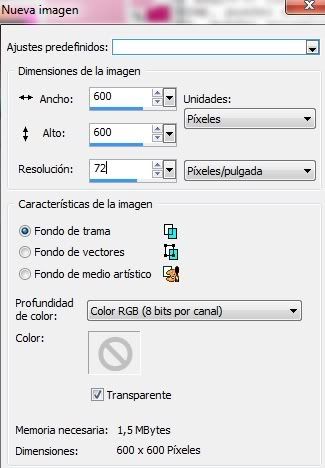
Open a 600x600px new canvas, transparent, 72px resolution.
Selections/Select All
Open the mask Disyas_Mask3.jpg and minimize.
Open the paper Disyas_SE_P9.jpg
Edition/Copy
Go back to your canvas
Edition/Paste into selection
Select None
Now you can close the original paper.
STEP 2
Apply the mask now.
Layer/New Mask Layer/From a new image

with the next settings: Ventana origen: Disyas_Mask3.jpg, Source Luminance

Now you will have in your Layer Palette the next:
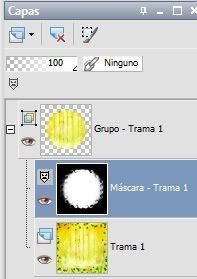
Layer/Merge/Merge group

STEP 3
Open Disyas_SE_Em12.png
Edition/Copy
Edition/Paste as new layer
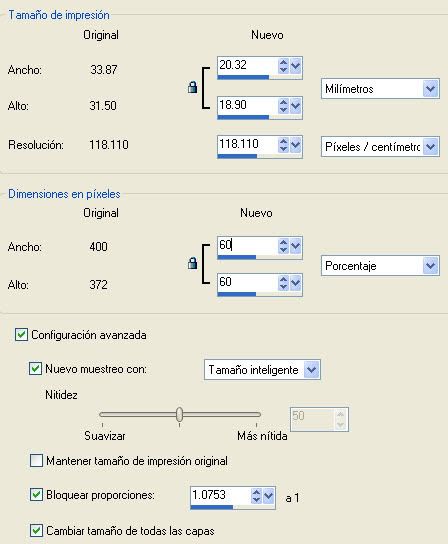
We will change the size of the little leaves, so we will reduce to 80%
with the next settings:

With your Move Tool, move the leaves to the top in the right corner.
Layer/Duplicate
Image/Mirror
Image/Flip
STEP 4
Open your tube.
Edition/Copy
Go back to your canvas
Edition/Paste as new layer
Now you can close your tube.
With your Move tool, move a little down the tube.
We will apply some shadow to the tube.
Effects/3D Effects/Drop Shadow
Use the next settings: V3, H3, 50, 5, Black Color

Apply shadow again but change the settings as: H:-3, V:-3
STEP 5
Open Disyas_SE_Border5.png
Edition/Copy
Go back to your canvas
Edition/Paste as new layer
You can close the original border.
Go back to the canvas.
With your Move Tool,
move the border to the bottom of the canvas
as you can see in the image.
Apply shadow with the next settings:
Effects/3D Effects/Drop Shadow
STEP 6Open Disyas_SE_Basket2.png
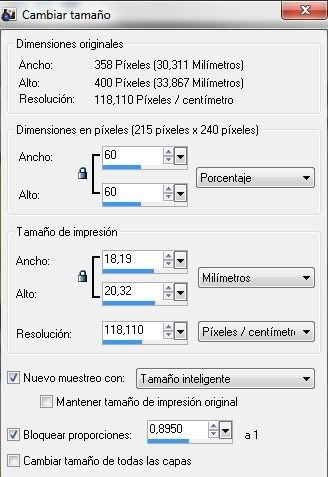
We will reduce the size to 60% using the next settings:
Edition/Copy
Go back to your canvas
Edition/Paste as new layer
Layer/Arrange/Move Down
With your Move tool, move the basket and place it as you can see
in the image.
At this moment, you will have something like this:
Apply some shadow to the basket.
Effects/3D Effects/Drop Shadow
with the next settings: v3, h3, opacity 50, Blur 5, Black color
Go back to your Border Layer, in your layer palette.

STEP 7
Open Disyas_SE_Nature17.png
Edition/Copy
go to your canvas
Edition/Paste as new layer
Resize the tree, reduce 80% as we did on the STEP 3.
Move the tree to back, the tree will be placed between the tube and the green leaves.
Layer/Arragen/Move Down
We will do this 3 times.
When the tree stay behind the tube,
with your Move tool, move the tree
to the place that you can see at the image.
Now apply Shadow to the tree:
Effects/3D Effects/Drop Shadow,
with the next settings:
V1, H1, Opacity 50, Blur 3, Black color.

STEP 8
Open Disyas_SE_Em10.png
Edition/Copy
Go back to the canvas
Edition/Paste as new layer
Move down this layer behind the tree.
Layer/Arrange/Move Down
Go to your Layer Palette, click to activate your top layer (the border layer)
In this step, we will use the Font that you have installed.
STEP 9
Set your Foreground at #369109
Set your background at #fefcb1

Click on your Text Tool,with the next settings:
Tangerine, 95, Bold, center, anti alias Sharp, Stroke width 2, Vector.

Click at the top of the canvas and write:
"Sweet Easter".
At this step, you will have something like this:

Layer/Convert to Raster Layer
PASO 10
Apply to the text some Inner Bevel.
Effects/3D Efecs/Inner Bevel
with the next settings: Bevel 2, widht 10, smoothness 2, depth 2,
ambience 5, Shininess 0, White color, angle 315, intensity 50, elevation 30

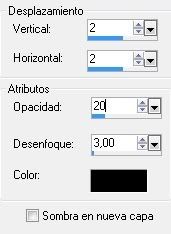
Apply some shadow
Effects/3D Effects/Drop Shadow
with the next settings:
V2, H2, Opacity 20, Blur 3, Black color
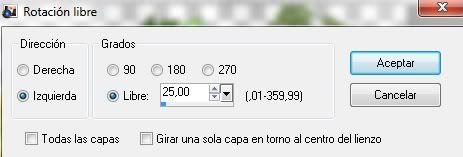
STEP 11
We will rotate the text to the left
Image/Free rotate
with the next settings:
Left Direction, Free, 25º
To finish the tutorial, add your license number of the tube
and your name.
We have finished the tutorial, I hope you have enjoyed the tutorial.