Latest Scrap Kits Released, Ptu and Free.
More info available at my blog: http://disyasdigitalsdesigns.blogspot.com

Pages

Latest Kit Released! Ptu and Free

martes, 6 de julio de 2010

New tag by Linda, made with Dream Princess Kit

Buenos días, en esta ocasión les traigo esta hermosa tag que Linda: http://tagcatz.blogspot.com, hizo con mi PTU Dream Princess Kit. Linda, muchisimas gracias, esta tag es preciosa. =)

Podrán encontrar el tutorial en su blog: http://tagcatz.blogspot.com, asi como muchos tutoriales sensacionales, estoy segura que lo disfrutarán!


Good day, this time I bring to you this beautiful tag that Linda: http://tagcatz.blogspot.com made my PTU kit Dream Princess. Linda, thank you very much, this tag is so beautiful. =)

You can find the tutorial on her blog: http://tagcatz.blogspot.com, like many other great tutorials, I'm sure you will enjoy!

lunes, 28 de junio de 2010

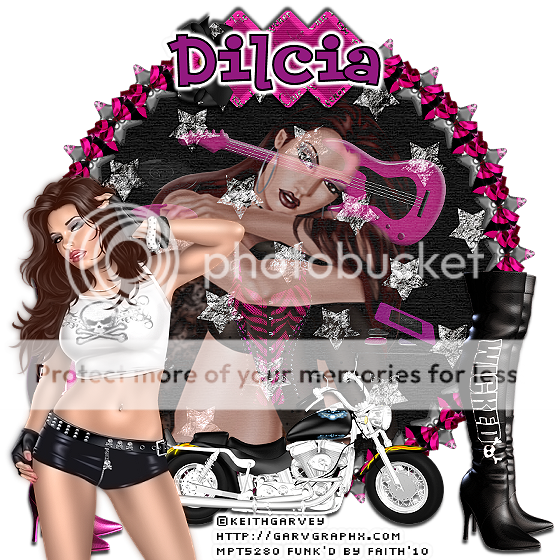
New Tag with the Rocker Chic Collab made by Faith Richards


Hola a todos, en estos días no he escrito mucho, sin embargo, he estado trabajando en varios proyectos que estoy segura les encantarán! Son algunos kits y packs de elementos. Cuando era niña me gustaba mucho que mi madre me leyera cuentos, ella tenía un libro que se llamaba "Florilegio de Cuentos" y recuerdo una historia en particular, se llamaba "El Ruiseñor y la Rosa", era un historia triste y romántica, de la cual les hablaré en otra ocasión pues seguramente me extenderé. La razón de mencionar esto es, que desde que recuerdo he amado escuchar historias, me fascina, creo que soy una buena oyente. Cuando salgo al centro de la ciudad, suelo mirar los rostros de las personas que caminan a mi lado y me pregunto qué historias existirán detrás de cada uno de aquellos rostros... sin duda, todas interesantes y dignas de escuchar. A veces, intento imaginar un poco estas historias... y esto finalmente, es lo que me impulsa al crear mis kits, contar una historia o dejar una puerta abierta para que cada uno de ustedes creen su propia historia.

Alguno de los proyectos en los que estoy trabajndo actualmente son precisamente eso, el inicio de una historia y cada uno de ustedes, podrán continuarlas al crear sus layouts o kits con los elementos que las conforman.

Bien, en esta ocasión deseo mostrarles una hermosa tag que fue hecha con mi parte en la Collaboración Rocker Chic que elaboré para Enchanted Dreams Boutique, esta colaboracion está disponible en la tienda actualmente. Esta tag fue hecha por Faith Richards y pueden encontrar el tutorial en su fantastico blog: http://faithslaceytuts.blogspot.com/2010/06/wicked-rock-tutorial.html , donde podrán encontrar otros maravillosos tutoriales. Faith, muchas gracias!! Es una hermosa tag!


Hello everyone, these days I have not written much, but I've been working on several projects that I'm sure you will love! Will be kits and elements packs. As a child I loved my mother read me stories, she had a book called "Anthology of Stories" and I remember one particular story was called "The Nightingale and the Rose" was a sad and romantic story of which I will speak on another occasion for surely I will have much to comment about it. The reason for mentioning this is that since I remember I loved to hear stories, I think that that is why I'm a good listener. When I go to downtown, i see the people walking by my side and I wonder what stories exist behind each of those faces ... all interesting and worth to listening. At times, try to imagine some of these stories ... and this is what inspires me to create my kits, tell a story or leave the door open so that each one of you create your own history.

Some of the projects I'm currently working are just that, the beginning of a story that you may continue to create your layout or kits with the elements that i create.

Well, this time I want to show a beautiful tag that was made with my part in the Collaboration Rocker Chic organized by Enchanted Dreams Boutique, this collaboration is available in the store today. This tag was made by Faith Richards and can be find the tutorial on her fantastic blog: http://faithslaceytuts.blogspot.com/2010/06/wicked-rock-tutorial.html, where you can find other wonderful tutorials. Faith, thank you very much! It is a beautiful tag!

lunes, 7 de junio de 2010

New Tag and Tut Made by Maree Giles with my kit Dream Princess

Quiero presentar esta hermosa Tag hecha por Maree Giles, pueden encontrar este sensacional tutorial en su blog: http://stardustndreams.blogspot.com/2010/06/dream-princess.html. Maree tiene hermosos tutoriales en su blog.

Maree, muchas gracias por esta hermosa tag! =)


I want to present this beautiful Tag made by Maree Giles, you can find this stunning tutorial on her blog: http://stardustndreams.blogspot.com/2010/06/dream-princess.html. Maree has wonderful tutorials on her blog.

Maree, thank you very much for this beautiful tag! =)

martes, 25 de mayo de 2010

New Tutorial with my Dream Princess Kit made by Conchi

Hola, les tengo otra novedad el día de hoy: esta hermosa tag hecha con mi PTU kit "Dream Princess". Esta hermosa tag fue hecha por Conchi DNScraps, Conchi, mil gracias, esta tag es bellísima, me encantó!

Podrán encontrar el tutorial en http://www.graficospsp.com/indexdreamsp.htm
Disfruto mucho ver estos trabajos, son un regalo para mi después del trabajo realizado. Realmente esto no tiene precio para mi, gracias.

Hello, I have another new today: This beautiful tag made with my PTU kit "Dream Princess". This beautiful tag was made by Conchi DNScraps, Conchi, thank you, this tag is beautiful, I loved it!

You can find the tutorial http://www.graficospsp.com/indexdreamsp.htm
I enjoy when i receive these works, are a gift for me after work. This really is priceless for me, thanks.

jueves, 29 de abril de 2010

New Tag/Tut "Aurora" PTU Kit by Darkmoons Dreams

Otra novedad para todos ustedes, una nueva tag/tutorial hecho con mi PTU kit "Aurora". Esta tag y tutorial fue hecho por Darkmoon Dreams, y es preciosa, me gustó mucho.
Dani, mil gracias por este hermoso trabajo! Podrán encontrar este tutorial y muchos más en el blog de Darkmoon Dreams http://darkmoonsdreamtuts.blogspot.com/2010/04/tut-aurora.html, hay trabajos muy bellos, estoy segura que los disfrutarán!

------

Other new for all of you, a new tag / tutorial done with my PTU kit "Aurora." This tag and tutorial was made by Darkmoon Dreams http://darkmoonsdreamtuts.blogspot.com/2010/04/tut-aurora.html, and it's beautiful, I liked a lot.
Dani, thank you for this wonderful work! You can find this tutorial and many more in the Blog Darkmoon Dreams, her tags and tutorials are very beautiful, I'm sure you will enjoy them!

lunes, 5 de abril de 2010

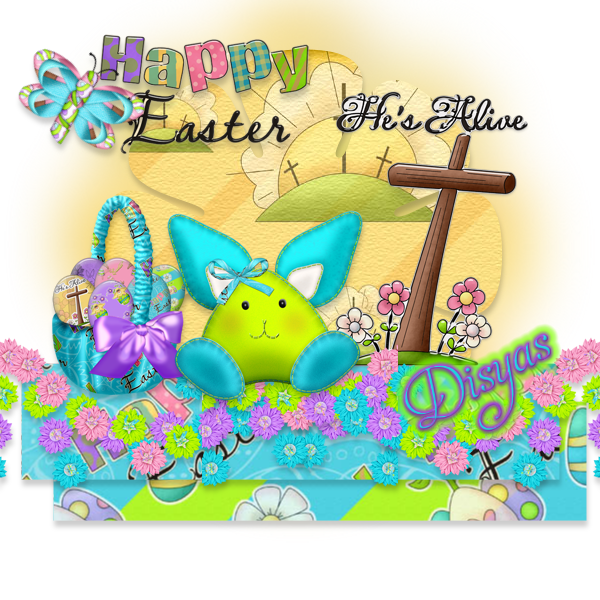
"HAPPY EASTER" SPANISH TUTORIAL

TUTORIAL "HAPPY EASTER"

Este tutorial fue escrito por mi: Disyas Digitals Designs el 4 de Abril de 2010 con mis propias ideas, cualquier similitud con otro tutorial, es mera coincidencia.
Puedes usar este tutorial para uso personal solamente.

Para realizar este tutorial, necesitarás :
PSP.
Mi kit PTU “Happy Easter”, puedes adquirirlo aqui.
De mi kit, necesitaremos los siguientes elementos:
Disyas_HE_Paper2
Disyas_HE_Paper7
Disyas_HE_Paper16
Disyas_HE_Clipart3
Disyas_HE_Clipart
Disyas_HE_Basket1
Disyas_HE_Bunny2
Disyas_HE_Butterfly2
Disyas_HE_Overlay

Paso 1
Abre Disyas_HE_Paper2, Disyas_HE_Paper7 and Disyas_HE_Paper16,
Minimizalos.

Paso 2
Abre un nuevo lienzo de 600x600, transparente, 72 de resolución
Pon tu color de primer plano(foreground) en nulo.
En tu color de relleno o background, coloca como trama o patron el papel numero 2

Paso 3
Ve a tu herramienta Forma Predefinida y escoge el rectángulo.
Selecciona la opicón “Crear como vector” en tu barra de herramientas.
Y en ancho para el estilo de linea, 1.
Traza un rectangulo como en la imagen.
Ve a tu capa actual en la paleta de capas, clic derecho con el mouse y da clic en la opción “convertir en capa de trama”

Paso 4
Ve a tu herramienta “Forma Predefinida” y escoge alguna forma de tu agrado.
Con los mismos valores que antes, pon como color de relleno o background, tu papel 16.
Puedes ayudarte de la imagen, para ver la posición de la nueva forma.
Ve a la capa que contiene la forma que acabas de trazar, y da clic derecho con el mouse, “convertir en capa de trama”.
Menu organizar/Enviar al fondo

Paso 5
Pon en tu color de relleno el papel 7.
Repite el paso 3.
Con tu herramietna Mover, mueve tu forma hacia abajo y a la derecha un poco.
Organizar/enviar al fondo
Esta forma o figura, quedará detrás del rectángulo.
Ahora puedes cerrar los papeles originales.

Paso 6
Abre Disyas_HE_Clipart3
Edicion/Copiar
Ve a tu lienzo
Edicion/pegar como nueva capa
Con tu herramienta Mover, coloca la cruz en la posición que puedes ver en la imagen.
Ahora, puedes cerrar el original.

Paso 7
Abre Disyas_HE_Clipart
Edicion/Copiar
Ve a tu lienzo
Edicion/pegar como nueva capa
Ve a Imagen/Cambiar Tamaño/reducimos en un 60%
Con tu herramienta Mover, mueve el letrero de Happy Easter al lugar que puedes ver en la imagen.
Ahora, puedes cerrar el original.

Paso 8
Abre Disyas_HE_Basket1
Edicion/Copiar
Ve a tu lienzo.
Edicion/pegar como nueva capa
Ve a Imagen/Cambiar Tamaño/y reducimos en un 50%
Con tu herramienta Mover, coloca la canasta como aparece en la imagen.
Ahora puedes cerrar el original.

Paso 9
Abre Disyas_HE_Bunny2
Edicion/Copiar
Ve a tu lienzo
Edicion/pegar como nueva capa
Ve a Imagen/Cambiar Tamaño/reducimos en un 60%
Con tu herramienta Mover, coloca el conejito en la posicion que puedes ver en la imagen.
Ahora, cierra el original

Paso 10
Abre Disyas_HE_Butterfly2
Edicion/Copiar
Ve a tu lienzo
Edicion/pegar como nueva capa
Ve a Imagen/Cambiar tamaño/reduciremos en un 60%
Ahora, cierra el original
Ve a Imagen/Rotación libre/Rotaremos a la derecha, modo libre, 45º
Con tu herramienta Mover, coloca la mariposa en el lugar que se muestra en la imagen.

Paso 11
Abre Disyas_HE_Overlay
Edicion/Copiar
Ve a tu lienzo
Edicion/pegar como nueva capa
Ve a Imagen/Rotación libre/Derecha, libre, 90º
Ve a Imagen/Cambiar tamaño/reducimos a 50%
Ahora puedes cerrar el original
Arrastra esta capa detrás del conejito y hacia la izquierda del lienzo..
Duplica esta capa. Ve a Imagen/Espejo.

Paso 12
Ve a la capa con la figura a la que le pusiste el papel 16
Clic derecho sobre la capa (en tu paleta de capas), Duplicar
Ve a Capas/Organizar/Bajar
Ve a Imagen/Cambiar Tamaño/115%
Ve a Ajustar/Desenfoque/Desenfoque Gausiano/26

Paso 13
Aplicaremos sombra a las figuras con los papeles, al conejito, la canasta o cesta, la mariposa, los overlays de flores y el titulo “Happy Easter”.
Usaremos los siguientes ajustes:
Efectos/Efectos 3D/Aplicar sombra/6,1,20,7.25

Listo!
Ahora añade tu nombre, marca de agua o créditos y licencia si usaste algun tube.
Espero que lo hayas disfrutado!

"HAPPY EASTER" ENGLISH TUTORIAL

"HAPPY EASTER" TUTORIAL

This tutorial was written by me: Disyas Digitals Designs in 04/04/2010 and any
resemblance to other tutorials is purely coincidental.
You may use this tutorial for personal use only.

To make this tuto, you will need :
PSP.
My PTU Kit “Happy Easter”, you can buy it here.
From my PTU kit, we will need to use:
Disyas_HE_Paper2
Disyas_HE_Paper7
Disyas_HE_Paper16
Disyas_HE_Clipart3
Disyas_HE_Clipart
Disyas_HE_Basket1
Disyas_HE_Bunny2
Disyas_HE_Butterfly2
Disyas_HE_Overlay

Step 1
Open Disyas_HE_Paper2, Disyas_HE_Paper7 and Disyas_HE_Paper16,
Minimize them.

Step 2
Open a new canvas 600x600, transparent, 72 resolution
Set your Foreground as null
Set your background with the paper 2

Step 3
Go to your Preset Shape tool, and chose Rectangle.
Check the option “Create as vector” in your tool bar.
And width of style line, as 1.
Draw a rectangle like in the image.
Go to the layer, and rasterize layer.

Step 4
Go to your Preset Shape tool, and chose a shape of your choice.
With the same settings that before, set your background with the paper16
You can see the picture to look place.
Go to the layer with your shape and right click, rasterize layer.
Menu organize/send to back

Step 5
Set your background with the paper 7.
Repeat the step 3.
With your Move tool, move your new shape a little down and to the right.
Organize/send to back
This shape will be behind of the first rectangle.
Now you can close the original papers.

Step 6
Open Disyas_HE_Clipart3
Edit/Copy
Go to your canvas
Edit/paste as new layer
With your Move tool, place the cross as you can see in the picture.
Now, you can close the original

Step 7
Open Disyas_HE_Clipart
Edit/Copy
Go to your canvas
Edit/paste as new layer
Go to Image/Resize/Reduce to 60 percent
With your Move tool, place the Word Art as you can see in the picture.
Now, you can close the original

Step 8
Open the Disyas_HE_Basket1
Edit/Copy
Go to your canvas
Edit/paste as new layer
Go to Image/Resize/Reduce to 50 percent
With your Move tool, place the basket as you can see in the picture.
Now, you can close the original

Step 9
Open Disyas_HE_Bunny2
Edit/Copy
Go to your canvas
Edit/paste as new layer
Go to Image/Resize/Reduce to 60 percent
With your Move tool, place the bunny as you can see in the picture.
Now, you can close the original

Step 10
Open Disyas_HE_Butterfly2
Edit/Copy
Go to your canvas
Edit/paste as new layer
Go to Image/Resize/Reduce to 60 percent
Now, you can close the original
Go to Image/Free rotate/Right, Free, 45º
With your Move tool, place the butterfly as you can see in the picture.

Step 11
Open Disyas_HE_Overlay
Edit/Copy
Go to your canvas
Edit/paste as new layer
Go to Image/Free rotate/Right, Free, 90º
Go to Image/Resize/Reduce to 50 percent
Now, you can close the original
Drag this layer behind the bunny and the basket and move to the left of the canvas.
Duplicate this layer. Go to Image/Mirror.

Step 12
Go to your layer with the shape with the paper 16
Right click over the layer, Duplicate
Go to Layers/Organize/Move down
Go to Image/Resize/115percent
Go to Adjust/Blur/Gaussian Blur/26

Step 13
We will apply Shadow to the three shapes, bunny, basket, butterfly, overlays and WordArt
With the next settings:
Effects/3D Effects/Drop Shadow/6,1,20,7.25

Ready!
Now add your name, watermark or credits and license if you used a tube.
I hope you enjoyed!