Latest Scrap Kits Released, Ptu and Free.
More info available at my blog: http://disyasdigitalsdesigns.blogspot.com

Pages

Latest Kit Released! Ptu and Free

miércoles, 26 de enero de 2011

SEXY VALENTINE - SPANISH TUTORIAL


TUTORIAL SEXY VALENTINE
VERSION EN ESPAÑOL


Este tutorial fue escrito por mi Dilcia aka Disyas Digitals Designs,
el día 25 de Enero de 2011. Fue elaborado con mis propias ideas,
cualquier similitud con algun otro tutorial es mera coincidencia.
Este tutorial fue realizado en PSPXI, pero podría realizarse en otra version.


MATERIALES NECESARIOS

PTU Kit "Romanza", el cual puede ser adquirido aqui o aquí.
Tube "Cupid" de Keith Garvey, puedes comprarlo aqui.
Fuente Annabelle o la de tu elección.
Mi mascara numero 9, puedes encontrarla aqui http://disyasdigitalsdesigns.blogspot.com/2010/02/english-masks.html


PASO 1

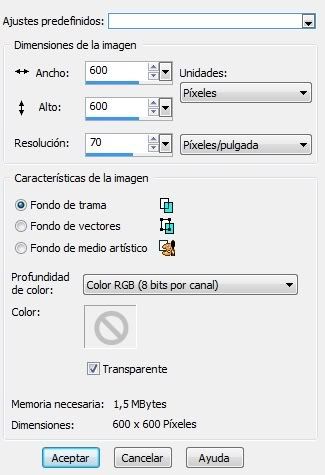
Abre un lienzo de 600x600px, tranparente, 72 dpi
Abre el papel Disyas_Romanza_P13


PASO 2

Elige la herramienta Selección con los siguientes ajustes:


Traza un rectangulo como el que se muestra en la imagen.

Ahora procederemos a usar nuestro papel que abrimos como color de relleno.
Ve a tu color frontal y selecciona Trama, busca el papel y eligelo.
Una vez que lo tienes en tu paleta de colores, elige tu herramienta Bote de Pintura.
Llena tu selección.
Anular la selección


PASO 3

Abre el frame Disyas_Romanza_Fr7
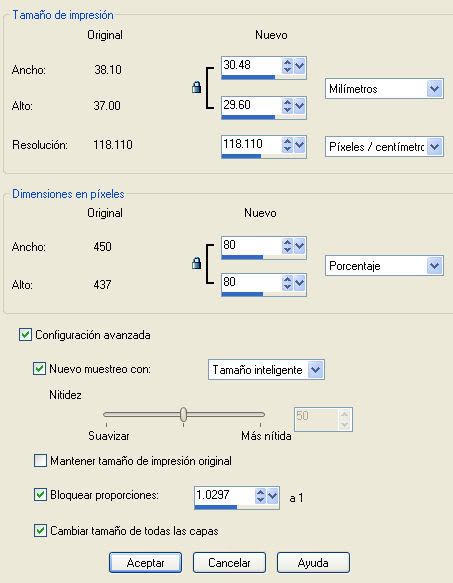
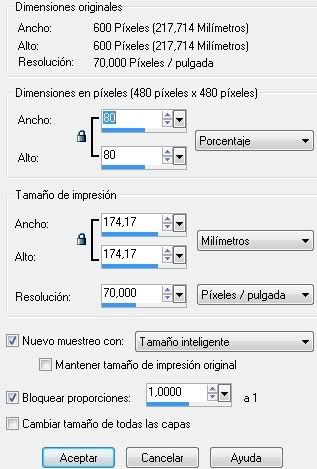
Reduciremos el frame en un 60%
Edicion/Copiar

Regresemos a nuestro lienzo
Edicion/Pegar como nueva capa

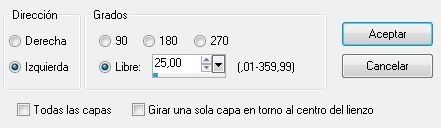
Vamos a rotar nuestro frame hacia la derecha 25º,
usando los siguientes ajustes:


Con tu herramienta mover, ubica el frame en la esquina superior derecha del rectangulo
que rellenamos anteriormente.


PASO 4
Duplicaremos este frame,
Ve al menu capas/Duplicar

Como queremos el frame en el lado opuesto al primero, iremos a:
Imagen/Espejo

Ahora ya tenemos nuestros dos frames en la parte superior.


PASO 5


Abre Disyas_Romanza_Emb7
Edicion/Copiar
Regresamos a nuestro lienzo
Edicion/Pegar como nueva capa
Con nuestra herramienta Mover, ubica el borde como se ve en la imagen

PASO 6

Abre Disyas_Romanza_Btn9
Reduce a 70%
Edicion/Copiar
Regresa a tu lienzo
Edicion/Pegar como nueva capa

Con tu herramienta Mover, ubica el corazon-boton en la ubicacion que se muestra
en la imagen.

PASO 7

Abre Disyas_Romanza_El34
Reduce en un 60%
Edicion/Copiar
Regresa a tu lienzo
Edicion/Pegar como nueva capa
Con tu herramienta Mover, ubica la botella en el lugar que se muestra en la imagen.

PASO 8

Abre Disyas_Romanza_Gift7
Reduce en un 70%
Edicion/Copiar
Regresa a tu lienzo
Edicion/Pegar como nueva capa

PASO 9

Abre el tube y elige el close up
Edicion/Copiar
Regresa a tu lienzo
Edicion/Pegar como nueva capa

Reduciremos nuestra imagen dentro del lienzo
Pon especial atencion en los ajustes en esta ocasion,
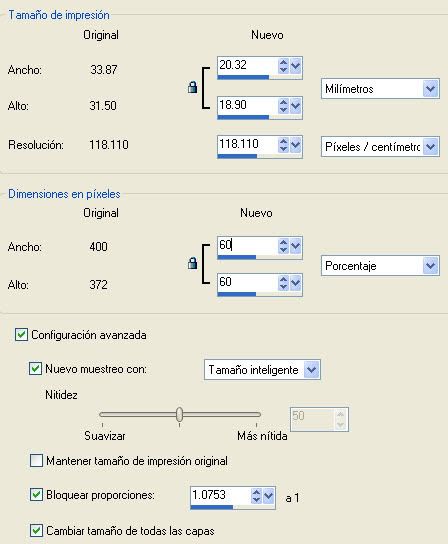
se encuentran señalados en la imagen:

Reduciremos en un 60%
Sin Seleccionar "todas las capas"

PASO 10

Una vez que hemos reducido el tube,
lo rotaremos hacia la derecha usando los mismos ajustes
que empleamos con el frame.

Ya que nuestro close up ha sido rotado,
bajaremos el tube hasta que quede debajo del frame de la
derecha, para ello iremos a
Capas/Organizar/Bajar

Haremos esto hasta que la capa del tube, quede
debajo de la capa del frame.

Con nuestra herramienta mover, ubicaremos el tube
como se muestra en la imagen.

Duplicaremos el tube:
Capas/Duplicar
Imagen/Espejo

PASO 11

Ahora borraremos el excedente de los tubes.
Ubicate en la capa del primer frame dando click en ella.
Elige tu herramienta Seleccion con los ajustes siguientes:

Da un click fuera del frame, con lo que quedará seleccionada
el area externa al frame.

Ve a la capa del close up del tube que esta debajo de este frame
y presiona la tecla Delete o Supr una vez.
Anular Selección

Realizaremos el mismo procedimiento con el tube de la izquierda.
Una vez listo esto, iremos a nuestra capa superior.

PASO 12

Abrimos nuestro tube otra vez.
Ve a la capa del tube completo.
Edicion/Copiar
Regresa a tu lienzo
Edicion/Pegar como nueva capa

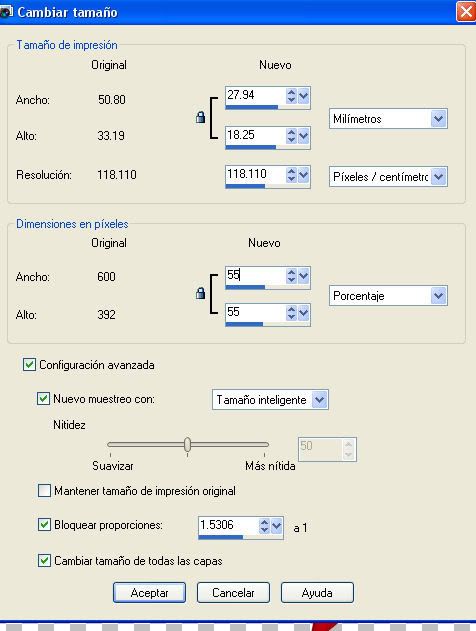
Reduciremos nuestro tube en un 80% como lo
hicimos en el paso 3.

"todas las capas" sin seleccionar

Con tu herramienta Mover, acomoda el tube como se muestra en la imagen.

PASO 13

Abre la mascara Disyas_SVMask9 y minimizala
Ve a tu capa del fondo y añade una nueva
Capas/Nueva Capa de Trama
Necesitamos que esta capa quede al fondo:
Capas/Organizar/Bajar


PASO 14

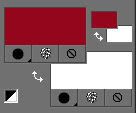
Pon tu color frontal a #d01938
Toma tu herramienta Bote de Pintura y llena tu nueva capa
Aplicaremos la mascara sobre esta capa
Capas/Nueva Capa de Mascara/ A partir de una imagen..
Usa los siguientes ajustes:


Vemos que nuestra mascara se ha aplicado en nuestra capa
que hemos llenado de rojo, sin embargo, son varias capas.
Vamos a fusionarlas.
Activa tu capa de la mascara
Capas/Fusionar/Grupo


PASO 15

Ahora, aplicaremos sombra a los frames, la botella, el corazon,
los chocolates y nuestro tube principal.
Efectos/Efectos 3D/Aplicar Sombra, usa los siguientes ajustes:

PASO 16

Ahora ve a tu capa frontal, la que esta encima de todas.
Anula tu color frontal y pon tu color de fondo en #ffffff

Escribiremos nuestro texto "Sexy Valentine"

Elige tu herramienta Texto, la fuente que yo usé es Annabelle, pero tu
puedes usar la que prefieras. Escribe el texto con los siguientes ajustes:


Aun en tu herramienta Texto, mueve tu puntero cerca del centro de tu
linea de texto, una vez que cambie a una cruz de flechas, mueve tu
texto y centralo a la posicion que se muestra en la imagen.
Convertiremos nuestra capa de Vector en capa de Trama
Capas/Convertir a capa de trama

PASO 17

Aplica Bisel Interior a tu texto
Efectos/Efectos 3D/Bisel interior
Usa los siguientes ajustes

PASO 18

Aplica Sombra al texto
Efectos/Efectos 3D/Aplicar Sombra
Usa los siguientes ajustes:


Bien, hemos terminado nuestro tutorial.
Ahora solo añade tu marca de agua, el copyright the Keith Garvey, tu numero de licencia,
y listo!! Espero que hayas disfrutado este tutorial!

CUPID TIME TUTORIAL - English Ver.

CUPID TIME TUTORIAL - ENGLISH VERSION

This tutorial was made by me Dilcia aka Disyas Digitals Designs,
in January 19th, 2011. Was made from my own ideas, any
Any resemblance to other tutorials is purely coincidental.
This tutorial was made in PSPXI, but you can make it in other version.


NEEDED SUPPLIES:

Filter DSB Flux
PTU Kit "Romanza", you can buy it here, here or here.
Tube "Valentines Angel" by Ismael Rac. You can buy it here: http://xeracx.com/
Font of your choice.


STEP 1

Open a new canvas, 600x600 px, transparent, 72 resolution.

STEP 2

Open Disyas_Romanza_Fr4
Reduce the frame to 80%
Image/Resize/ 80%

Edit/Copy
Go to your canvas
Edit/Paste as new layer

STEP 3

Open Disyas_Romanza_P5
Image/Resize/55%

Edit/Copy
Go back to your canvas
Edit/Paste as new layer

We need take this layer one position back:
Layers/Arrange/Move Down
With your Move tool, move the paper to the center of the canvas


STEP 4

Now apply the filter DSB Flux - Linear Transmission
Effects/Plugins/DSB Flux - Linear Transmission, use the next settings:
Slice Size 5, Offset 3, Blend -12, Direction Horizontal


STEP 5

Go to your layer where we put the hearts frame.

Open Disyas_Romanza_Btn7
Edit/Copy
Go to your canvas
Edit/Paste as new layer
With the Move Tool, move the btn7 and place it in the same position that you can see in the
image.


STEP 6

Open Disyas_Romanza_R6
Image/Resize/60%

Edit/Copy
Go back to your canvas
Edit/Paste as new layer
Place the bow as you can see in the image.

STEP 7

Open Disyas_Romanza_El12
Resize to 50% as we did in the Step 2
Edit/Copy
Go back to your canvas
Edit/Paste as new layer
With the Move tool, place the kiss in the right upper corner.


STEP 8

Open Disyas_Romanza_Gift6
Resize to 60% as we did in the step 2
Edit/copy
Back to your canvas
Edit/Paste as new layer


STEP 9

Open Disyas_Romanza_El27
Resize to 70%
Edit/Copy
Go back to your canvas
Edit/Paste as new layer

Lets go to rotate a little the roses bouquet
Image/Rotate/Free rotate, use the next settings: Direction Left, free, 25º


STEP 10

Open the Ismael Rac tube
At this time, we will use the close up image
Resize by 80% as we did in the step 2

Edit/copy
Go back to your canvas and activate the layer with the pink paper
Edit/Paste as new layer

With the Move tool, place the tube as you can see it in the image

We can see that part of the tube is out of the frame, so, we will erase this part.
Go to your Magic Wand tool and use the next settings: Add, rgb, 20, contiguos


Activate the layer with the circular frame of hearts and click with your wand out of the frame.
You'll obtain what you can see in the next image


Now, go back to your layer where your tube is.
Press the delete key or supr key once.
By this way, we will delete in one step all the parts of the tubes that are out of the frame

STEP 11

We are so close to finish the tutorial.
Go to the top layer (roses bouquet).

Open the Ismael Rac Tube, this time not the close up, we need the complete tube
Edit/Copy
Go to your canvas
Edit/Paste as new layer

With your Move tool, place the tube in the position that you can see in the example.

STEP 12

We will apply some noise to the kiss.
Activate the kiss layer.
Adjust/Add or remove noise/Add noise
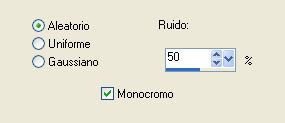
Use the next settings: Random, noise 50%, monochromatic

Now, apply some shadow to the btn.
Activate the btn layer.
Effects/3D Effects/Drop Shadow
Use the next settings: 2,2, 60,5, black


We will apply Shadow with the same settings to the cookies,
roses bouquet, bow, tube (not the close up) and kiss.

STEP 13

Now, write the tittle: Cupid Time
With your Text Tool, and the next settings:Alako-Bold, 60, Bold, Left,smooth, Stroke Width 2.
write the text.
You can use the font of your choice.


Apply Inner Bevel to the text.
Effects/3D Effects/Inner Bevel.

You will get the next screen, accept.


Use the next settings to apply the inner bevel:
Bevel 1, 31,10,4,0,10,white, 315, 45, 35.

Now, apply Shadow to the text,same settings than before.

STEP 14

To finish, add your watermark, Ismael Rac Copyright,
your license number and done!
We finished the tutorial, hope you enjoy it!

CUPID TIME TUTORIAL - Spanish Ver.

CUPID TIME TUTORIAL - VERSION EN ESPAÑOL

Este tutorial fue escrito por mi Dilcia aka Disyas Digitals Designs,
el día 19 de Enero de 2011. Fue elaborado con mis propias ideas,
cualquier similitud con algun otro tutorial es mera coincidencia.
Este tutorial fue realizado en PSPXI, pero podría realizarse en otra version.


MATERIALES NECESARIOS
Filtro DSB Flux
PTU Kit "Romanza", el cual puede ser adquirido aqui, aqui o aqui.
Tube "Valentines Angel" de Ismael Rac. Puedes comprarlo aqui.
Fuente la de tu elección.


PASO 1
Abre un lienzo de 600x600 px, fondo transparente, 72 de resolución.


PASO 2

Abre Disyas_Romanza_Fr4
Vamos a reducir el frame al 80%
Imagen/Cambiar Tamaño/ Reducir 80%

Edicion/Copiar
Ve a tu lienzo
Edicion/Pegar como nueva capa

PASO 3

Abrimos Disyas_Romanza_P5
Reducimos el papel:
Imagen/Cambiar Tamaño/Reducir 55%

Edicion/Copiar
Regresamos al lienzo
Edicion/Pegar como nueva capa

Pasaremos esta capa hacia atrás:
Capas/Organizar/Bajar
Con tu herramienta Mover, mueve el papel a que quede centrado

PASO 4

Ahora aplicaremos el filtro: DSB Flux - Transmision Lineal
Iremos a Efectos/Complementos/DSB Flux - TRansmision Lineal con los siguientes ajustes:
Slice Size 5, Offset 3, Blend -12, Direction Horizontal


PASO 5

Vayamos a nuestra capa donde tenemos el frame de corazones.

Abrimos ahora Disyas_Romanza_Btn7
Edicion/Copiar
Volvemos al lienzo
Edicion/Pegar como nueva capa
Con la herramienta Mover ubicamos el boton como se muestra en la imagen.


PASO 6

Abrimos Disyas_Romanza_R6
Reduciremos al 60%
Imagen/cambiar tamaño/60% menos

Edicion/Copiar
Volvemos a nuestro lienzo
Edicion/Pegar como nueva capa
con la herramienta Mover, ubicamos el moño como aparece
en la imagen.

PASO 7

Abrimos Disyas_Romanza_El12
Reducimos a un 50% como lo hicimos en el paso 2
Edicion Copiar
volvemos a nuestro lienzo
Edicion/Pegar como nueva capa
Con la herramienta Mover, ubicamos el beso en la esquina superior derecha.

PASO 8

Abrimos Disyas_Romanza_Gift6
Reducimos al 60% como lo hicimos en el paso 2
Edicion/copiar
Regresamos a nuestro lienzo
Edicion/Pegar como nueva capa

PASO 9

Abrimos Disyas_Romanza_El27
Reducimos al 70%
Edicion/Copiar
Volvemos a nuestro lienzo
Edicion/Pegar como nueva capa

Vamos a rotar un poco el bouquet de rosas
Imagen/Rotacion libre, con los siguientes ajustes: Izquierda, rotacion libre, 25º


PASO 10

Abrimos el tube de Ismael Rac
En esta ocasion el del close up
Vamos a reducir en un 80% como lo hicimos en el paso 2

Edicion/copiar
Volvemos a nuestro lienzo y nos situamos en la capa de nuetro papel rosa
Edicion/Pegar como nueva capa

Con la herramienta Mover, acomodamos el tube como se muestra en la imagen.

Vemos que tenemos un excedente del tube,
bien, vamos a eliminar el excedente.
Iremos a nuestra herramienta Varita Magica con los siguientes ajustes:
Añadir, valor RGB, 20 tolerancia, Contiguo


Posicionate en la capa donde esta el frame de circular
de corazones de papel y da click en el exterior.
Se te debe seleccionar como se muestra en la imagen a continuación.


Ahora regresa a tu capa donde esta el tube.
Presiona la tecla Delete o Supr una vez.
De este modo eliminaremos rapidamente el excedente.


PASO 11

Estamos por terminar, iremos a la capa superior, que debe ser la del bouquet de rosas.

Abre el tube donde se muestra la chica completa.
Edicion/Copiar
Regresemos a nuestro lienzo
Edicion/Pegar como nueva capa

Con tu herramienta mover, mueve el tube de modo que quede como en la imagen.

PASO 12

Demos los ultimos toques a nuestra tag.
Daremos un poco de ruido al beso de la esquina.
Posicionate en la capa del beso.
Ve a Ajustar/Agregar o quitar ruido/Agregar ruido
Usa los ajustes siguientes: Aleatorio, ruido del 50%, monocromo

Ahora, aplicaremos sombra al boton.
Ubicate en la capa del boton.
Ve a Efectos/Efectos 3D/Aplicar Sombra
Usa los siguientes ajustes: 2,2,60,5, negro


Realizaremos el mismo paso para aplicar sombra a la canasta de galletas,
el bouquet de flores, el moño, el tube completo y los labios.

PASO 13

Ahora escribiremos el titulo: Cupid Time
Con tu herramienta Texto y los siguientes ajustes, introduce el texto.
Puedes usar la fuente de tu elección.


Le aplicaremos al texto Bisel interior.
Ve a Efectos/Efectos 3D/Bisel Interior.

Te saldrá la siguiente pantalla, dale aceptar.


Usa los siguientes ajustes para aplicar el bisel interior:
Bevel 1, 31,10,4,0,10,white, 315, 45, 35.

Ahora, aplica sombra al texto, la misma que aplicamos con anterioridad.

PASO 14

Para finalizar, añade tu marca de agua, el copyright del tube y tu licencia y listo!
Hemos terminado el tutorial. Espero que lo hayas disfrutado!

viernes, 1 de octubre de 2010

Christmas on July made with my FTU Kit - English

This tutorial was writen by me: Dilcia aka DisyasDD, on September 26, 2010 from
my own ideas. Any resemblance to other tutorials is purely coincidental.
You may use this tutorial for personal use only.

To make this tutorial, you will not need any filter. Was made in PSP XI, but you could use with other versions.

Needed Supplies:

Disyas_COJ_FR4
Disyas_COJ_G1
Disyas_COJ_P4
Disyas_COJ_Tag1
Disyas_COJ_TB2
Tube of your choice


Note:
This materials are from my FTU kit "Christmas on July".
You can find it in Blog Trains sections in my blog:
http://disyasdigitalsdesigns.blogspot.com

The tube that i used is from the Artist Jennifer Janesko, called "The Gift",
you can buy it at: http://www.cilm.com
Please, dont forget to write in your tag your license number.

Let's go!!!


Step 1

Open a new canvas, 600x600, transparent, 72pp resolution.

Step 2

Open Disyas_COJ_P4
Go to Edit/Copy - Now you can close Disyas_COJ_P4
Go back to your canvas
Selections/Select All
Edit/Paste into the Selection
Deselect

Step 3

Let's go to apply some mask, use a default mask from PSP,
To do that, go to Layers/Load mask from disk
Choose a mask that you like and use the next settings:


You will see in your Layers Palette a group with your mask, we need to merge this group, so go to Layers/Merge group.

Step 4

Open Disyas_COJ_FR4
Go to Edition/Copy
Go back to your canvas
Edit/Paste as new layer

We will rotate the frame to the left:
So go to Image, Free Rotate/Left/25º


Step 5

We will apply shadow to the frame, go to:
Effects/3D Effects/Shadow
We will use the next configuration:
1,1,50,10, Black, Shadow in new layer not selected

We will apply shadow again, just change the configuration for the next:
-1, -1, 50, 10, Black, Shadow in new layer not selected


Step 6

Open the Jennifer Janesko tube or the tube of your choice.
We will reduce the size of the tube 70 percent.
Go to Image/Resize/70%

Use the next configuration:

Edit/Copy
go to your canvas
Edition/Paste as new layer
Now you can close your tube, don't save changes.


Step 7

We will rotate the image in the same orientation of the frame, so we will use the same configuration that you used in the Step 4.
Go to Layers/Organize/Move Down

With your Move Tool, move the tube and place it as you can see in the image preview.


Step 8 - Optional

Note: If the corner of the tube goes out of the frame, with our Erase Tool we will need to erase this part. Use in your Erase Tool the next configuration:
Circle, Size 32, Strength 100, Density 100, Opacity 100,
Sharp 100


Step 9

Open:

Disyas_COJ_TB2
Disyas_COJ_G1

Open Disyas_COJ_G1, go to Edition/Copy
Go back to the canvaz and go to the frame layer
Edit / Paste as new layer

Resize the gift 80% percent:
Image/Resize with the next settings:


With the Move Tool, put the gift in the place that you can see in the image.

Step 10

Open Disyas_COJ_TB2,
Edit/Copy.
Go to your canvas
Edition/ Paste as new layer

We will resize the Teddy Bear, you can use the same settings that we use with the gift in the Step 9.

Move the Teddy Bear back of the gift, go to
Layers/Organize/Send to Back

With your Move Tool, move the Teddy Bear to the position that you can see in the image.

Step 11

Apply shadow to the Teddy Bear and the Gift with the same settings used before in the Step 5.


Step 12

Open Disyas_COJ_Tag1
Edit/Copy
Go to your canvas
Edit/Paste as new layer

We will need to rotate the tag as we do with the frame and the tube.
Use the same settings that we use in the Step 4, just we will rotate 35º this time.

After that, apply shadow with the same settings used before.

Step 13

Now, add the text:

"Merry Christmas"

Set your foreground with the color: #f6ed8e
Set your background with the color: #961218

With you Text Tool and the next settings, write: "Merry Christmas":

font: Brush Script
Size: 54
Style: Bold
Aling : center
Stroke: 1


Note: You can choose other font. Depending the font of your choice, the settings could change.

After you write your text, go to the text layer, right click over the layer and select Rasterize.
We will rotate the Text using the settings that we use to rotate the frame.


Step 14

We will apply some shadow to the font, we will use the settings that we use in the Step 4.

We will apply some bevel in the Text too:
Effects/3D Effects/Inner Bevel
with the next settings:


Step 15

To finis this tutorial add your cilm license number to your tag and your name too.
I hope that you have enjoyed this tutorial as i did.