
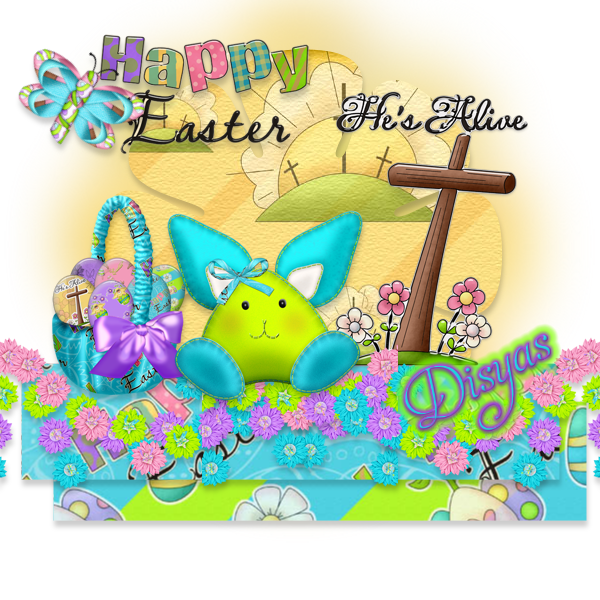
"HAPPY EASTER" TUTORIAL
 This tutorial was written by me: Disyas Digitals Designs in 04/04/2010 and any
resemblance to other tutorials is purely coincidental.
You may use this tutorial for personal use only.
To make this tuto, you will need :
PSP.
My PTU Kit “Happy Easter”, you can buy it here.
From my PTU kit, we will need to use:
Disyas_HE_Paper2
Disyas_HE_Paper7
Disyas_HE_Paper16
Disyas_HE_Clipart3
Disyas_HE_Clipart
Disyas_HE_Basket1
Disyas_HE_Bunny2
Disyas_HE_Butterfly2
Disyas_HE_Overlay
Step 1
Open Disyas_HE_Paper2, Disyas_HE_Paper7 and Disyas_HE_Paper16,
Minimize them.
Step 2
Open a new canvas 600x600, transparent, 72 resolution
Set your Foreground as null
Set your background with the paper 2
Step 3
Go to your Preset Shape tool, and chose Rectangle.
Check the option “Create as vector” in your tool bar.
And width of style line, as 1.
Draw a rectangle like in the image.
Go to the layer, and rasterize layer.
Step 4
Go to your Preset Shape tool, and chose a shape of your choice.
With the same settings that before, set your background with the paper16
You can see the picture to look place.
Go to the layer with your shape and right click, rasterize layer.
Menu organize/send to back
Step 5
Set your background with the paper 7.
Repeat the step 3.
With your Move tool, move your new shape a little down and to the right.
Organize/send to back
This shape will be behind of the first rectangle.
Now you can close the original papers.
Step 6
Open Disyas_HE_Clipart3
Edit/Copy
Go to your canvas
Edit/paste as new layer
With your Move tool, place the cross as you can see in the picture.
Now, you can close the original
Step 7
Open Disyas_HE_Clipart
Edit/Copy
Go to your canvas
Edit/paste as new layer
Go to Image/Resize/Reduce to 60 percent
With your Move tool, place the Word Art as you can see in the picture.
Now, you can close the original
Step 8
Open the Disyas_HE_Basket1
Edit/Copy
Go to your canvas
Edit/paste as new layer
Go to Image/Resize/Reduce to 50 percent
With your Move tool, place the basket as you can see in the picture.
Now, you can close the original
Step 9
Open Disyas_HE_Bunny2
Edit/Copy
Go to your canvas
Edit/paste as new layer
Go to Image/Resize/Reduce to 60 percent
With your Move tool, place the bunny as you can see in the picture.
Now, you can close the original
Step 10
Open Disyas_HE_Butterfly2
Edit/Copy
Go to your canvas
Edit/paste as new layer
Go to Image/Resize/Reduce to 60 percent
Now, you can close the original
Go to Image/Free rotate/Right, Free, 45º
With your Move tool, place the butterfly as you can see in the picture.
Step 11
Open Disyas_HE_Overlay
Edit/Copy
Go to your canvas
Edit/paste as new layer
Go to Image/Free rotate/Right, Free, 90º
Go to Image/Resize/Reduce to 50 percent
Now, you can close the original
Drag this layer behind the bunny and the basket and move to the left of the canvas.
Duplicate this layer. Go to Image/Mirror.
Step 12
Go to your layer with the shape with the paper 16
Right click over the layer, Duplicate
Go to Layers/Organize/Move down
Go to Image/Resize/115percent
Go to Adjust/Blur/Gaussian Blur/26
Step 13
We will apply Shadow to the three shapes, bunny, basket, butterfly, overlays and WordArt
With the next settings:
Effects/3D Effects/Drop Shadow/6,1,20,7.25
Ready!
Now add your name, watermark or credits and license if you used a tube.
I hope you enjoyed!
No hay comentarios:
Publicar un comentario