
 This tutorial was made by me Dilcia aka Disyas Digitals Designs,
in January 19th, 2011. Was made from my own ideas, any
Any resemblance to other tutorials is purely coincidental.
This tutorial was made in PSPXI, but you can make it in other version.
NEEDED SUPPLIES:
Filter DSB Flux
PTU Kit "Romanza", you can buy it here, here or here.
Tube "Valentines Angel" by Ismael Rac. You can buy it here: http://xeracx.com/
Font of your choice.
STEP 1
Open a new canvas, 600x600 px, transparent, 72 resolution.
 STEP 2
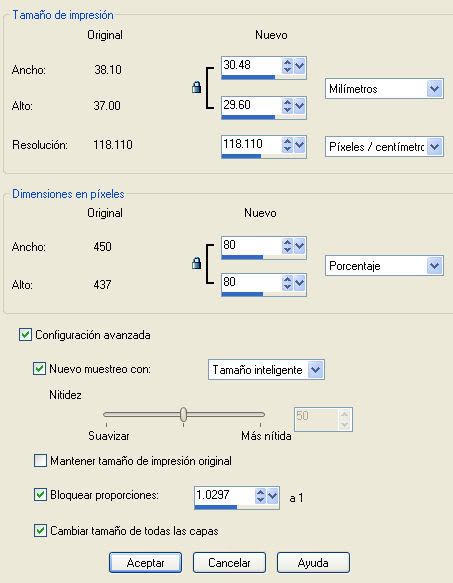
Open Disyas_Romanza_Fr4
Reduce the frame to 80%
Image/Resize/ 80%
Edit/Copy
Go to your canvas
Edit/Paste as new layer
STEP 3
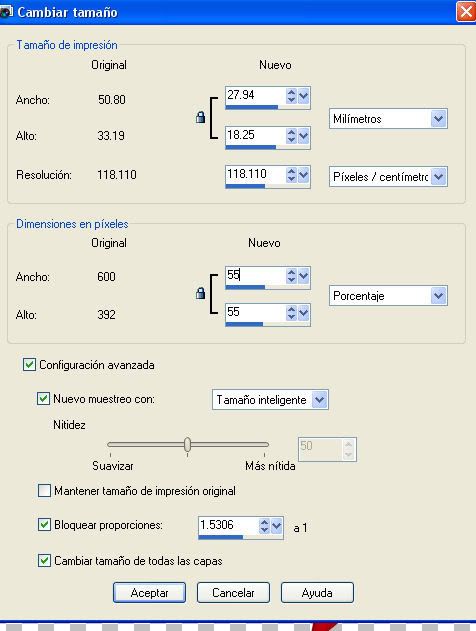
Open Disyas_Romanza_P5
Image/Resize/55%
 Edit/Copy
Go back to your canvas
Edit/Paste as new layer
We need take this layer one position back:
Layers/Arrange/Move Down
With your Move tool, move the paper to the center of the canvas
STEP 4
Now apply the filter DSB Flux - Linear Transmission
Effects/Plugins/DSB Flux - Linear Transmission, use the next settings:
Slice Size 5, Offset 3, Blend -12, Direction Horizontal

STEP 5
Go to your layer where we put the hearts frame.
Open Disyas_Romanza_Btn7
Edit/Copy
Go to your canvas
Edit/Paste as new layer
With the Move Tool, move the btn7 and place it in the same position that you can see in the
image.
STEP 6
Open Disyas_Romanza_R6
Image/Resize/60%
Edit/Copy
Go back to your canvas
Edit/Paste as new layer
Place the bow as you can see in the image.
STEP 7
Open Disyas_Romanza_El12
Resize to 50% as we did in the Step 2
Edit/Copy
Go back to your canvas
Edit/Paste as new layer
With the Move tool, place the kiss in the right upper corner.
STEP 8
Open Disyas_Romanza_Gift6
Resize to 60% as we did in the step 2
Edit/copy
Back to your canvas
Edit/Paste as new layer
STEP 9
Open Disyas_Romanza_El27
Resize to 70%
Edit/Copy
Go back to your canvas
Edit/Paste as new layer
Lets go to rotate a little the roses bouquet
Image/Rotate/Free rotate, use the next settings: Direction Left, free, 25º

STEP 10
Open the Ismael Rac tube
At this time, we will use the close up image
Resize by 80% as we did in the step 2
Edit/copy
Go back to your canvas and activate the layer with the pink paper
Edit/Paste as new layer
With the Move tool, place the tube as you can see it in the image
We can see that part of the tube is out of the frame, so, we will erase this part.
Go to your Magic Wand tool and use the next settings: Add, rgb, 20, contiguos
 Activate the layer with the circular frame of hearts and click with your wand out of the frame.
You'll obtain what you can see in the next image

Now, go back to your layer where your tube is.
Press the delete key or supr key once.
By this way, we will delete in one step all the parts of the tubes that are out of the frame
STEP 11
We are so close to finish the tutorial.
Go to the top layer (roses bouquet).
Open the Ismael Rac Tube, this time not the close up, we need the complete tube
Edit/Copy
Go to your canvas
Edit/Paste as new layer
With your Move tool, place the tube in the position that you can see in the example.
STEP 12
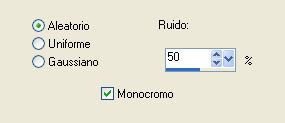
We will apply some noise to the kiss.
Activate the kiss layer.
Adjust/Add or remove noise/Add noise
Use the next settings: Random, noise 50%, monochromatic
 Now, apply some shadow to the btn.
Activate the btn layer.
Effects/3D Effects/Drop Shadow
Use the next settings: 2,2, 60,5, black

We will apply Shadow with the same settings to the cookies,
roses bouquet, bow, tube (not the close up) and kiss.
STEP 13
Now, write the tittle: Cupid Time
With your Text Tool, and the next settings:Alako-Bold, 60, Bold, Left,smooth, Stroke Width 2.
write the text.
You can use the font of your choice.
 Apply Inner Bevel to the text.
Effects/3D Effects/Inner Bevel.
You will get the next screen, accept.

Use the next settings to apply the inner bevel:
Bevel 1, 31,10,4,0,10,white, 315, 45, 35.
 Now, apply Shadow to the text,same settings than before.
STEP 14
To finish, add your watermark, Ismael Rac Copyright,
your license number and done!
We finished the tutorial, hope you enjoy it!
No hay comentarios:
Publicar un comentario